What’s eating our redcurrants. Update #3
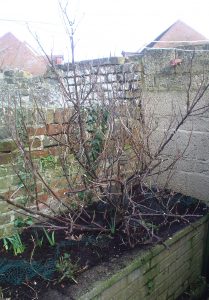
I ordered my usual three 70 litre bags of compost from Local Hardware Store during the week, and remembered to add a couple of bags of well-rotted horse manure to my order. So there’s now a layer of it sitting on the soil around my redcurrant bushes:
This is a follow on from my last post, where I’d discussed the sawfly problem with a fellow gardener. I also had a go at a bit of light pruning, clipping off any diseased twigs and removing one or two big branches that were rubbing up against other branches and generally getting in the way. But frankly I still don’t feel I know what I’m doing when it comes to pruning redcurrants.
The next stage is to wait till the leaves come out, and pick off any larvae that I find from the undersides. Hopefully most of them won’t have made it that far, thanks to the manure.
Encouraged by today’s lovely weather, I also turned over the compost heap, picked off surplus figs from the fig tree and divided the sorrel (grows in a black bucket, not visible in the above pic).
Categories: compost, crops, other pests, pruning Tags: compost, fig tree, figs, horse manure, manure, redcurrants, sawfly, sorrel
Things you can compost: jeans edition
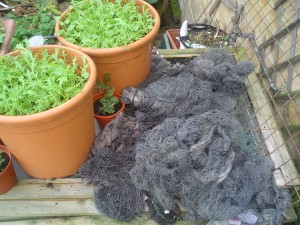
The picture below was taken last autumn and shows a couple of containers of mizuna. (Actually, it’s not just mizuna in those containers, but that’s for another post.) The bluish-grey mess on the right is something that started life as a pair of jeans. They spent some months in our Dalek compost bin and this is the result – all the cotton has rotted down, leaving strands of polyester and Lycra behind. It’s quite annoying having to fish out strands of synthetic fibre from our compost so I’ve now created a separate pile outside the compost bin, which is reserved for mixed fibre items like jeans, T-shirts, sheets etc. that are too nasty/stained/ripped to be given to a charity shop. Once the worms have had their fill, the synthetic residue is put out for the bin men!
Turning the compost heap – spring is here
It’s been a while since I’ve posted here – well over two years in fact. I got discouraged by the fact that this blog doesn’t get a whole lot of traffic, but on the other hand, it’s actually quite useful to me personally as a reminder of which jobs to do when. So I’m dusting it off and starting again.
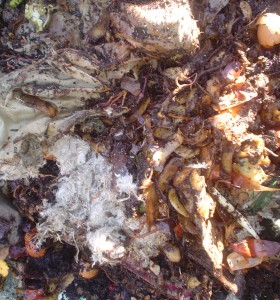
One of the first jobs of my gardening year is to turn the compost heap. In the past, this has happened as early as the end of February but in recent years spring has been slow in getting off the ground, so here we are in late March and I just got the compost heap done yesterday. It’s a job that involves donning some builder’s gloves, lifting our “Dalek” away, and putting the newer material at the top of the heap into buckets. Once you get further down (see below), everything starts to get all gungy and the worms are hard at work. Those feathery things you can see in the pic on the left are in fact, feathers. They’re from an old down-filled pillow that had got so dirty I decided to jettison it and buy a memory foam replacement. Feathers will rot down quite happily in a compost heap, as will wool and human hair. All three of these are made from protein so they are a source of nitrogen.
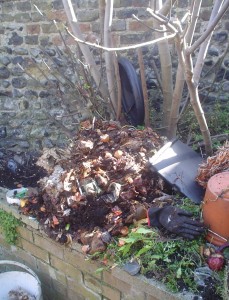
The picture on the right shows the same pile of partially rotted compost from a bit further away. It’s at the stage where there is one last layer to remove before you hit the really well-rotted stuff at the bottom. Once I’d reached this well-rotted stuff, I used a spade to transfer it to the hole to the left of the heap. There were several large buckets worth. I then covered the hole with a couple of black sacks weighed down with flower pots, bits of wood etc. This was for two reasons: (1) to help provide a nice warm environment for more composting to take place, and (2) to stop the local cats from using the compost as a toilet.
I put the Dalek back in its original place and refilled it with all the newer stuff that I’d put into buckets. Job done.
Trays of tomatoes… and strawberry corner
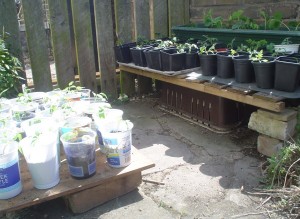
| On to the tomatoes. It takes a looong time to pot up this many seedlings. The ones on the left in the yoghurt pots are Brandywine; the ones on the right are Gardener’s Delight. Large yoghurt pots make excellent pots for seedlings – just create some holes in the bottom first (I use one end of a skewer, held in a gas flame, to melt the holes – the plastic is less likely to crack that way.) |
 |
Categories: compost, container type, crops Tags: brandywine, containers, gardeners delight, strawberries, tomatoes
The first job of the gardening year
…happened yesterday, when I turned over our compost heap. Which involved lifting the Dalek away, taking the top, virtually unrotted, layer off and putting it in a temporary container (a polystyrene fish crate), then transferring the more decomposed stuff underneath to the hole next to the Dalek. Then covering the hole and its contents with empty compost bags, and weighing them down with rocks. (This last step is vital, to prevent the compost from being used as a litter tray by cats – ours and our neighbours’.) All in all a very messy job, but a satisfying one.
In a month’s time, I’ll be able to use the compost in the hole to plant my first salad leaves, rocket and spring onions. In milder winters I’d consider doing this about now but it’s still mid-February and we’re not out of the woods yet as far as snow and sub-zero temperatures are concerned.
Speaking of sub-zero temperatures, I think these are what was responsible for the leak in our water butt. The water inside froze when we had our cold snap a couple of weeks back. Now whenever it rains, any water that collects in the bottom of the butt has leaked out within a few hours. Is it (a) possible and (b) worthwhile to repair a water butt, I wonder? Or shall I just get the credit card out and buy another one?
Categories: compost Tags: compost, water butt
Things I’ve learned this year – part 1
I have learned a few things this year which I will be taking on board for next year’s gardening activities, and I thought I’d put them in this blog because that way, I’ll be able to find the list! So, here goes:
1. When it comes to planting tomato seeds indoors, don’t do it too early. Early to mid-April will be fine – it’s only people who grow their tomatoes in a greenhouse or conservatory who can get away with doing it earlier.
2. This year, I am really kicking myself for growing the Gardener’s Pearl variety of cherry tomatoes as opposed to Tumbling Tom, as I did last year. Although the Tumbling Tom seeds were humungously expensive, the fruit were DELICIOUS. The Gardener’s Pearls are OK, but bland – better for cooking than eating.
3. Use big containers for courgettes – buckets with a 14 or 15 inch diameter, at least.
4. Two varieties of courgette which seem to be happy with container living and give nice yields are One Ball and Golden Zucchini. I don’t know if the fact that they are both yellow has anything to do with it. Just mulch ’em regularly with home-made compost and water them generously.
5. Boot fairs and charity shops are great places to buy cheap plants if you don’t want to grow everything from seed.
6. Order a bulk lot of compost early on – litre for litre, it works out half the price of the titchy little bags.
7. Planting dried peas in a container (yes, those dried peas you get in supermarkets) gives amazingly good results – a small but steady supply of pea shoots and tiny mange-tout.
8. A top tip from a man I know who lives around the corner and also grows veg: plant nasturtiums near your runner beans. Any blackfly will eat the nasturtiums and leave the beans alone. EDIT: don’t bother with this one – he reckons that the nasturtiums were what encouraged the blackfly in the first place, and has since got rid of them. Result: no more blackfly.
And finally, here is a picture of Lottie standing guard among the elephant garlic:
Categories: compost, container type, crops Tags: courgettes, peas, recommendations, things I've learned, tomatoes
Buying compost for your container garden – the non-driver’s guide
The other day I finally admitted to myself that using my home-made compost (lovely though it is) and buying the occasional 20 litre bag of compost from the local shops wasn’t really a very satisfactory way of going about things. I have a whole load of plants that are crying out to be potted up, and it’s just not fair on them to make them wait!
You might be thinking “why doesn’t she just hop in the car, go to B&Q and buy compost in bulk like everyone else?” The trouble is, I don’t have a car. Buying compost when you don’t have a car is a nightmare. Plus those 20 litre bags are expensive – about £3.00 a go. So when out shopping one day in Birchington I popped into the hardware store (Brills, which also does seeds and other gardening supplies), and ordered three 70 litre sacks for £10, plus £5 delivery (if you do the maths that works out at less than half the price of the 20 litre bag, litre for litre). The sacks arrived on Monday, and I’ve already used one of them!
Categories: compost Tags: buying compost
First real gardening job of the year
| Today has been beautifully sunny – an ideal time to get out in the garden and mark what for me is the start of the gardening year. And what better way to do that than turn over the contents of our compost bin? The picture shows what was inside, after I’d taken away the top layer of recent stuff. As you can (just) see, it’s a worms’ paradise! Another layer down was the really yummy, well-rotted matter, which I moved to my specially-designed “compost hole” immediately to the left of the compost bin, before replacing the compost bin and sticking the less well-rotted stuff back inside. A handy tip for anyone who loves gardening but doesn’t want to get their hands too dirty: wear builder’s gloves. The palms have a rubberised layer which protects your hands, but the gloves are thin enough for you not to feel as though you’re trying to tie your shoelaces while wearing boxing gloves. Another couple of months, and whatever’s in the compost hole will be ready to use. I ascribe the success of my tomato crops over the last two years to the use of pure home-made compost, so fingers crossed for this year! |
|
Categories: compost Tags: builder's gloves, compost
Comfrey tea (for your plants, that is)
| Every garden should have a comfrey plant. Comfrey is a perennial that doesn’t need a lot of TLC, and bees absolutely love comfrey flowers. But the best thing about comfrey is the fact that it sucks up soil nutrients, which end up in the leaves. So when comfrey leaves are added to your compost heap, they make the compost all the richer. I chopped back our comfrey plant (see below) a few weeks ago because some high winds had flattened the stalks. I put some of the stalks/leaves in our compost bin, but there wasn’t room for the rest so I used a bin bag for the overflow, left it in a corner of our back garden and forgot about it. | |
| Then a couple of days ago, I noticed a black, crude oil-like ooze coming from the bottom of the bag. But rather than bemoan the brown stain on the paving, I did a little happy dance! That “crude oil” was a fabulous fertiliser. The inside of the bag was a mass of tarry, half-decomposed stalks which had rotted down quite a bit, so I could now fit them into our compost bin. The inside of the bag was covered in goo, so all I did was fill a bucket with water and wash the bag out in the bucket. Ta-da! Comfrey tea. Not for human consumption I hasten to add, but diluted with about five more parts of water and used on our tomatoes and courgettes. (Like bees, tomatoes love comfrey.) You can also make comfrey tea by putting fresh comfrey leaves in a bucket, filling it with water and weighing the contents down with some large stones. After a few weeks, you’ll have a mixture that smells foul (think toilets), but which again, plants adore when diluted with ten parts water. |
Categories: compost Tags: comfrey, compost, fertiliser
Boot fairs: the thrifty gardener’s best friend
Went to local boot fair this morning and picked up six metal hanging baskets for £2.50! These will be fab for the rest of my Tumbling Tom tomato plants.
Weather is hot and muggy at the moment – if you lift the lid of our compost bin and poke your head inside, it must be all of 40 deg. C in there. At least. I have been doing a bit of research on compost, and it’s surprising the kind of things that will compost down quite happily – old wool and cotton clothes, human and cat hair, urine, cardboard egg boxes/loo roll cores… Actually, the latter are essential to provide a bit of “brown waste” to balance out the “green waste”, which is all your vegetable peelings, grass clippings etc. Having both types of waste ensures that your compost rots down consistently and ends up with a lovely crumbly texture and beautiful smell, rather than being all slimy. It might seem strange to wax lyrical about home made compost as I am here, but it really is fantastic stuff. As long as you’ve got a patch of soil to put your compost bin on, and ideally another patch of soil next to it, then it really is a worthwhile investment. Why is it good to have a bit of space next to your compost bin? Because it’s a great place for burying the nearly-useable-but-not-quite-there compost that you find in your bin when you “turn” your compost every few weeks in the summer. Stick some old carpet on top, leave for a fortnight and let the worms finish the job.
Mistyhorizon over at Hub Pages recommends using spent compost – mixed with a bit of sand – to grow carrots. That’s something I will definitely be trying next year. I’ve had a singular lack of success with container carrots so far, but I don’t think there’s anything to lose by giving it one more go – particularly as I won’t be shelling out any cash!
Categories: compost, container type Tags: carrots, compost, containers, hanging baskets
